
VIMP Installation Guide
Thank you for choosing VIMP!
In the following we will explain how to install and configure your new VIMP software. Additional help and how-tos can be found in our FAQ.
1. Installation
VIMP requires certain technical conditions. If you haven't already done, please check, if your server meets all requirements for installing and running VIMP: Technical Requirements
For production systems, we recommend a native installation of VIMP on the server. For test systems, we offer Docker images as an alternative. You can find the installation instructions for the Docker versions here.
Below, we describe the native installation of VIMP.
The installation process contains three steps:
- Installation of the webserver software (Apache/NGNIX, MySQL/MariaDB, PHP)
- Installation of the transcoding software (FFmpeg, exiftool)
- Installation of VIMP
Tip
On request, we'll be happy to carry out the installation for you on your server. Click here to contact us!
1.1 Installation of the webserver software
First, your server has to be equipped with the necessary webserver software. Normally your server should already be pre-configured with a LAMP system (Linux-Apache-MySQL-PHP).
Shouldn't that be the case, please install the required packages.
Find a tutorial for Debian and Ubuntu here:
- Installing the webserver, webhosting and VIMP under Debian 13
- Installing the webserver, webhosting and VIMP under Debian 12
- Installing the webserver, webhosting and VIMP under Ubuntu 24.04
Find a tutorial for RedHat here:
Find more tutorials for older distributions in our Install FAQ section. If you use another Linux distribution, please consult the respective support pages of the manufacturer.
Warning
To run VIMP Light, VIMP Ultimate [Standard] and VIMP Corporate editions, you need to install the free SourceGuardian extension.
Find the how-tos here:
- Installing the SourceGuardian PHP Extension with Debian 13 "Trixie"
- Installing the SourceGuardian PHP Extension with Debian 12 "Bookworm"
- Installing the SourceGuardian PHP Extension with Ubuntu 24.04
- Install SourceGuardian PHP extension: AlmaLinux 9/RHEL 9 with PHP 8.3
Further instructions for older distributions can be found in the SourceGuardian FAQs.
1.2 Installation of the transcoding software
Normally, the transcoding tools FFmpeg and exiftool are set up automatically when you install the web server (see above). Only if that doesn't work or if you want to install a newer version of FFmpeg should you follow the steps described in this article.
1.3 Installation of VIMP
After the webserver is set up and the transcoding tools are installed, we finally can install the actual VIMP software: Installation of the VIMP package.
Don't forget to set up the cron job for converting newly uploaded media and the cron job for the dashboard when you're done.
Note
Depending on the VIMP edition and version, additional cron jobs may be available. Here is a list of all cron jobs.
2. First steps
Congratulations! If all above steps have been finished successfully, VIMP is now installed on your server and you can start using it.
First, call VIMP by entering the domain of your server into the address bar of your browser.
Then login with the default access data:
User: admin
Password: admin
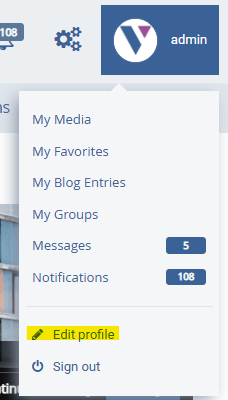
Then move the mouse over your user name in the top bar and click on the link for editing your profile to go to your profile page:
Then click on the "Change password" tab:
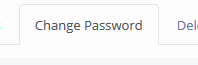
In the opening form enter the old password once and a new password of your choice twice and submit it. Now you successfully changed the most important access to your portal - the administrator account.
Next, click the "Administration" icon in the top bar:

Navigate to the user management by clicking the "User" link in the navigation and set new passwords for the other two default users "user" and "moderator" by moving the mouse pointer over the according data records and clicking "Set user password" in the context menu.
Now you secured your VIMP portal against unauthorised access by changing the passwords of the three default user accounts.
Tip
If you don't need the "user" and "moderator" users, you can delete them without hesitation. Just pay attention to keep one administrator user, because otherwise you will shut yourself out of the portal!
3. Quick Configuration
In the next step, check the most important VIMP configuration settings. In the backend click the "Configuration" link on the top right corner and then the submenu item "Portal".
Enter the correct domain of your server at "Web address" (including https://). Almost all configuration settings can be edited by clicking the "edit" link within the context menu that appears while moving the mouse pointer over a configuration item:

Next, navigate to the configuration item "Transcoding OpenSource". Check and, if necessary, correct the paths to the transcoding tools FFmpeg, FFprobe and exiftool. Normally, this is only necessary, if you compiled the transcoding tools by yourself and didn't use the distribution packages: Setting the transcoding tool paths
4. Ready - go!
Now you set up the most important settings of VIMP. How about going back to the frontend and start uploading your first video right now?
Tip
You can find a detailed description of all the administrative and configuration options in the VIMP backend in our Admin Guide. For a quick start, we also recommend our Starter Guide.